The Making Of AnaLogica.es
It's been almost a month since my last post and now it's when I say it's because I've been busy and think I meant lazy. For this time I have a proof: I've been making a website for a friend's pop band, Ana Lógica It's not completely finished but most of the work is already done.
I'll try to describe the proccess of creating such a site so beware of a very boring post if you are not into web development.
First Steps: requirements gathering
The first thing I did was talk with my friend/client about what they wanted. We decided to take another website as a model for a start point. That website is http://www.lombardafolk.com/ and I did it too, some years ago.
As this was very vague talking I had the feeling I lack more information from them about what exactly they wanted. The model website was about an old folk band and this one was about a new pop band and some requirements are different.
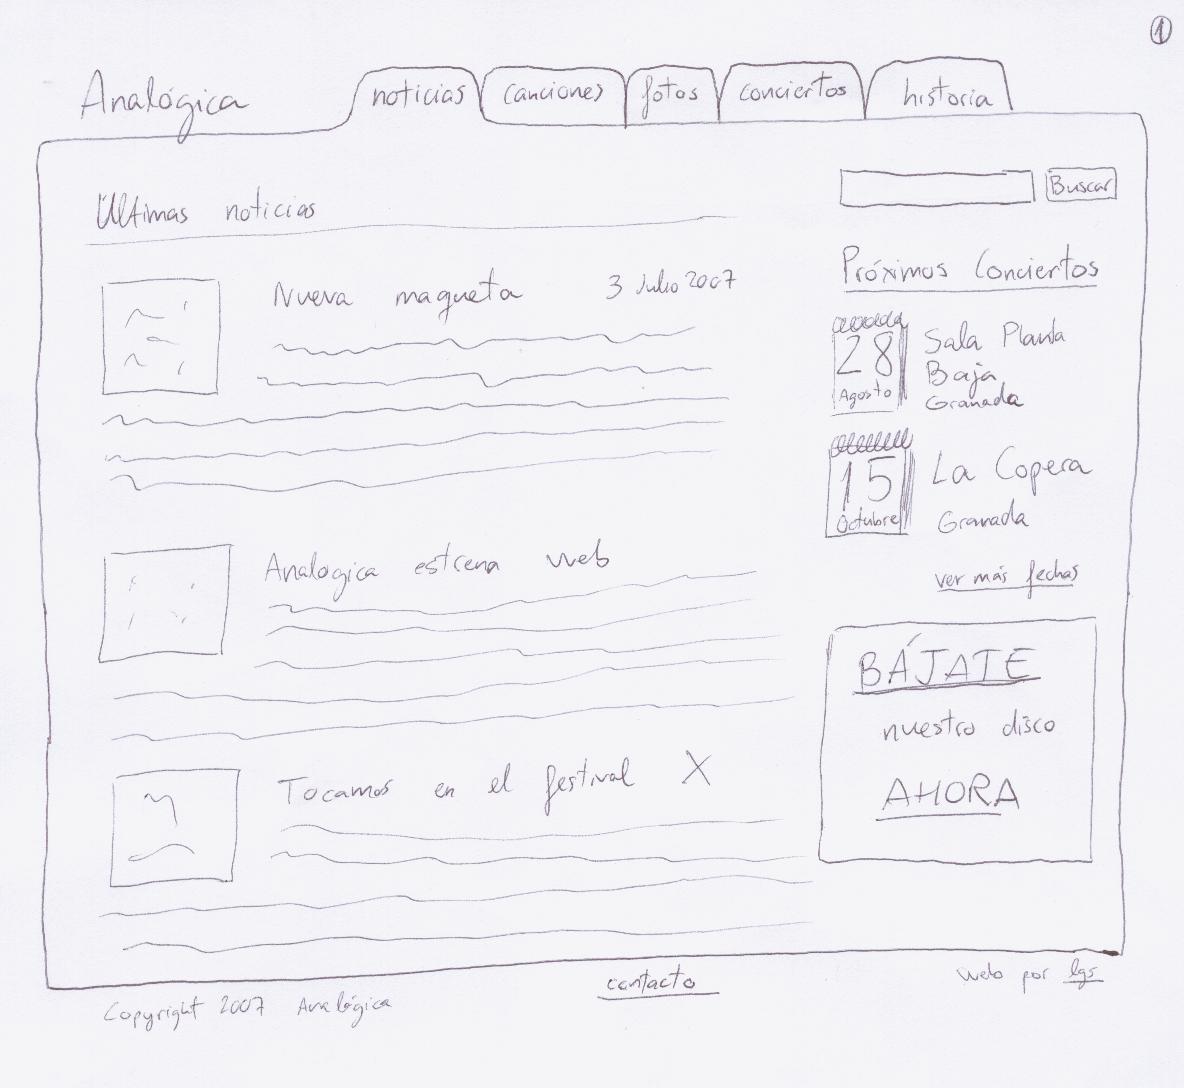
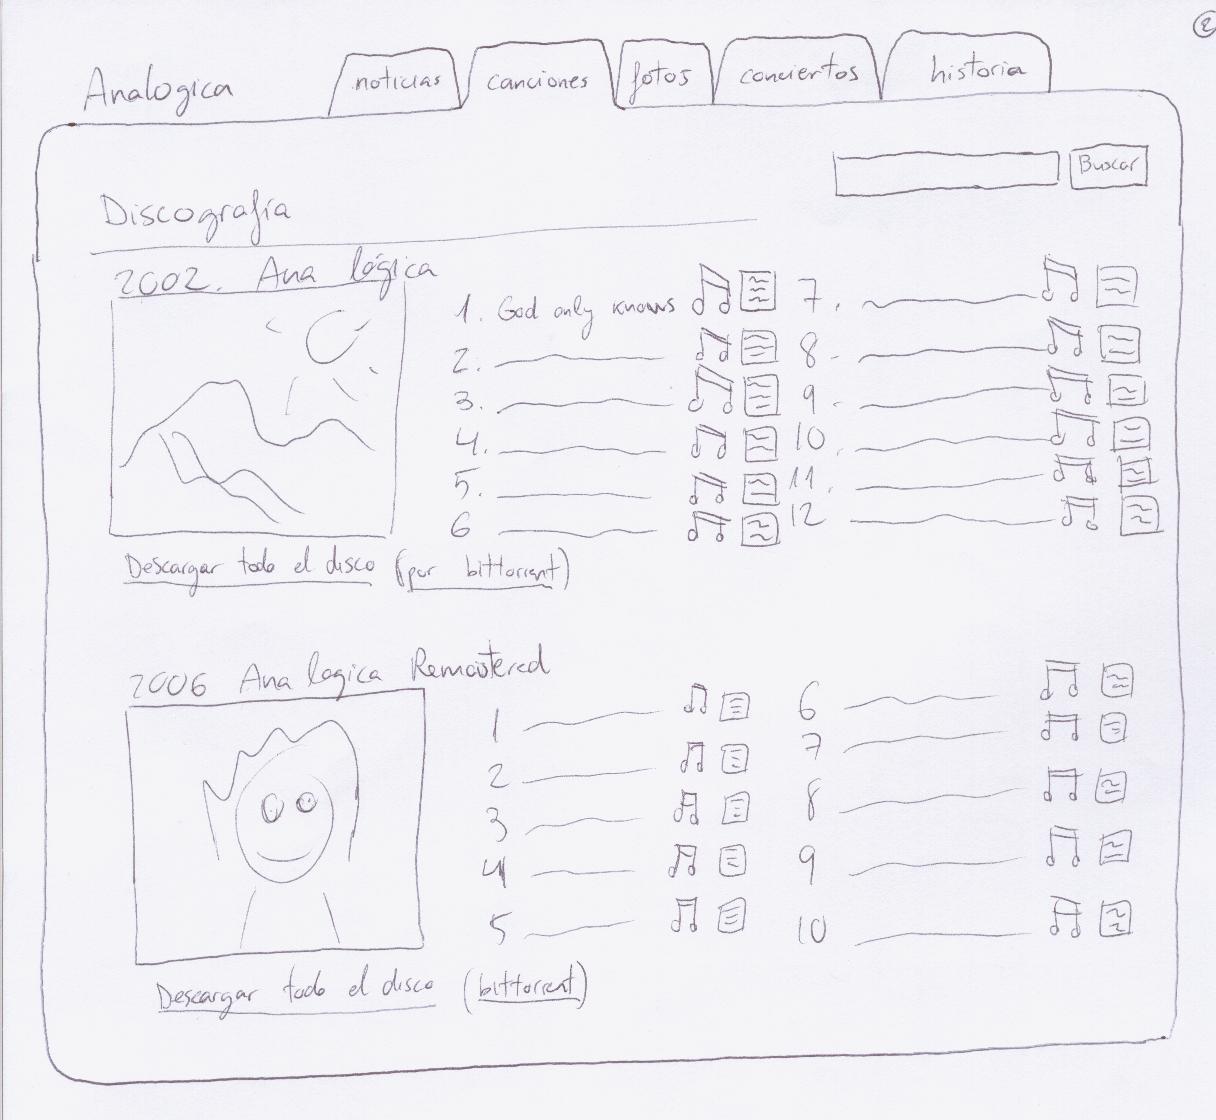
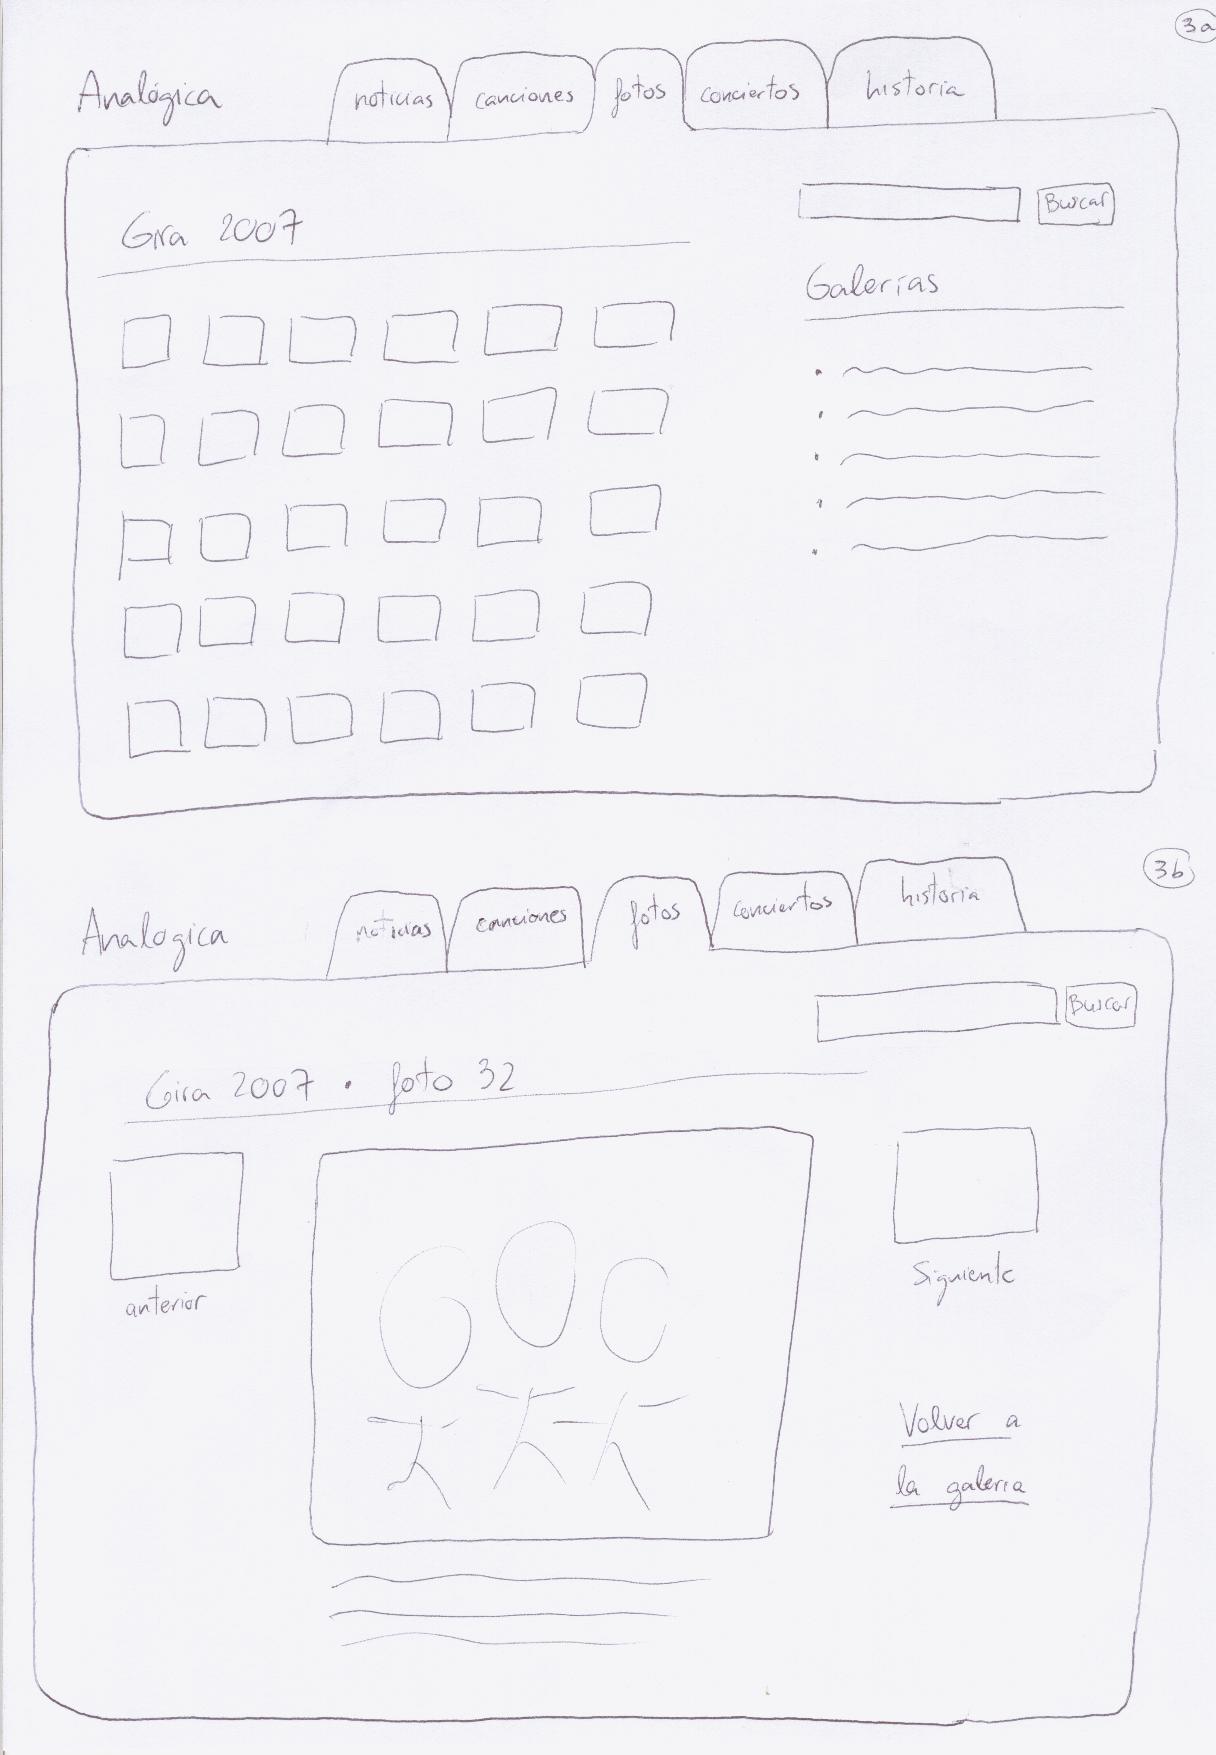
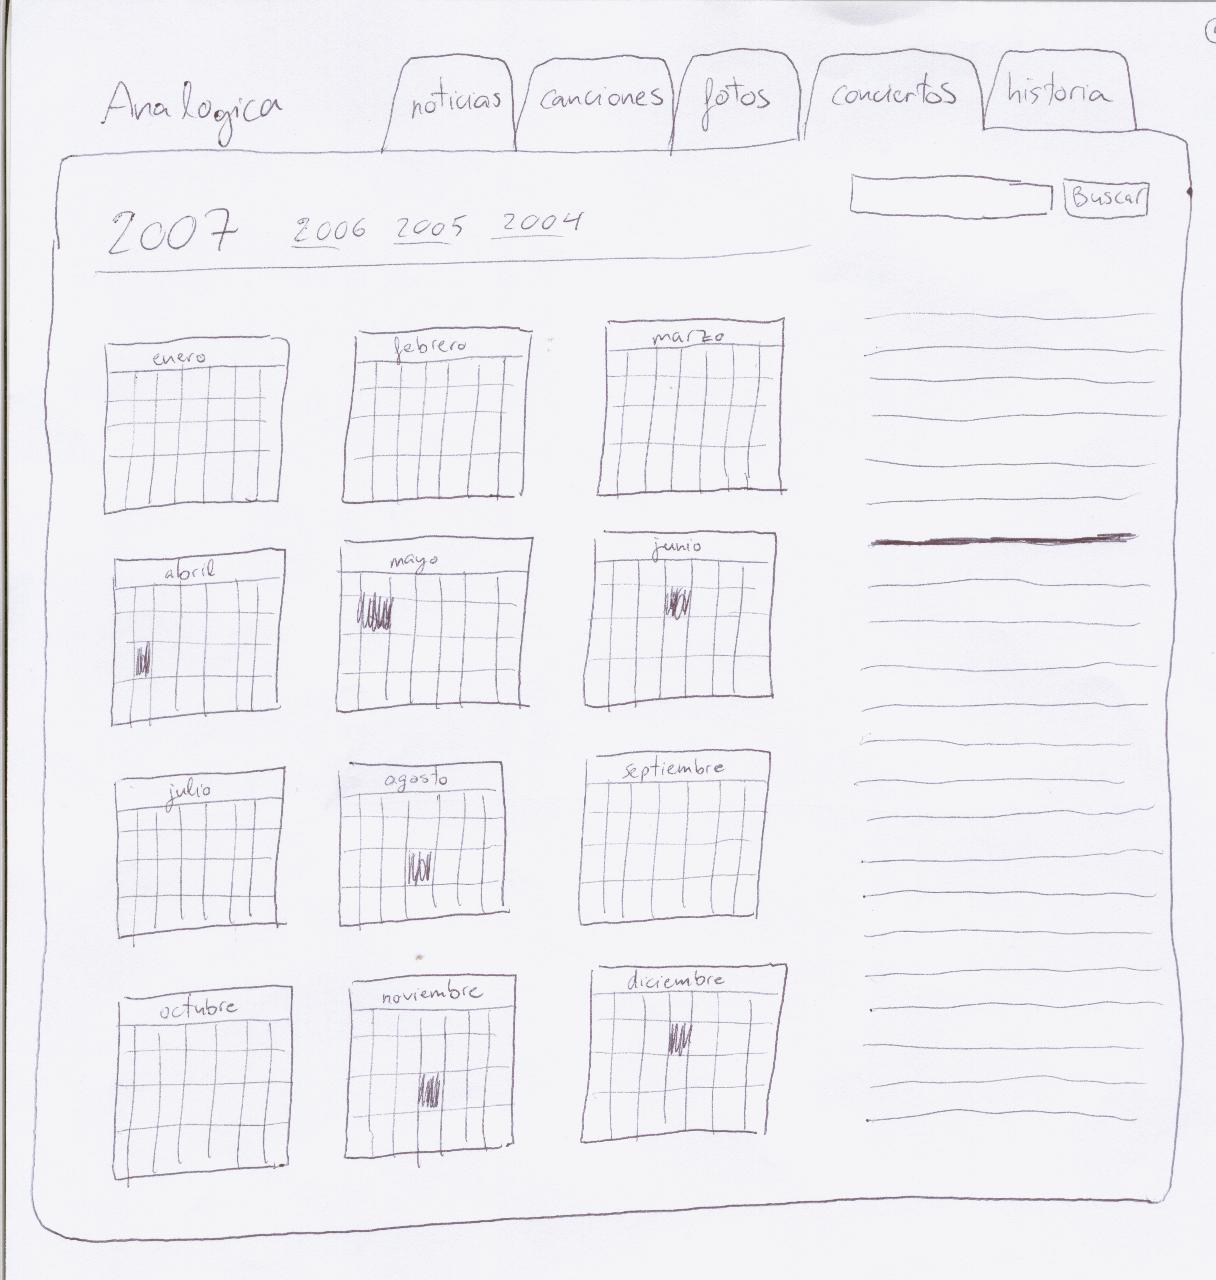
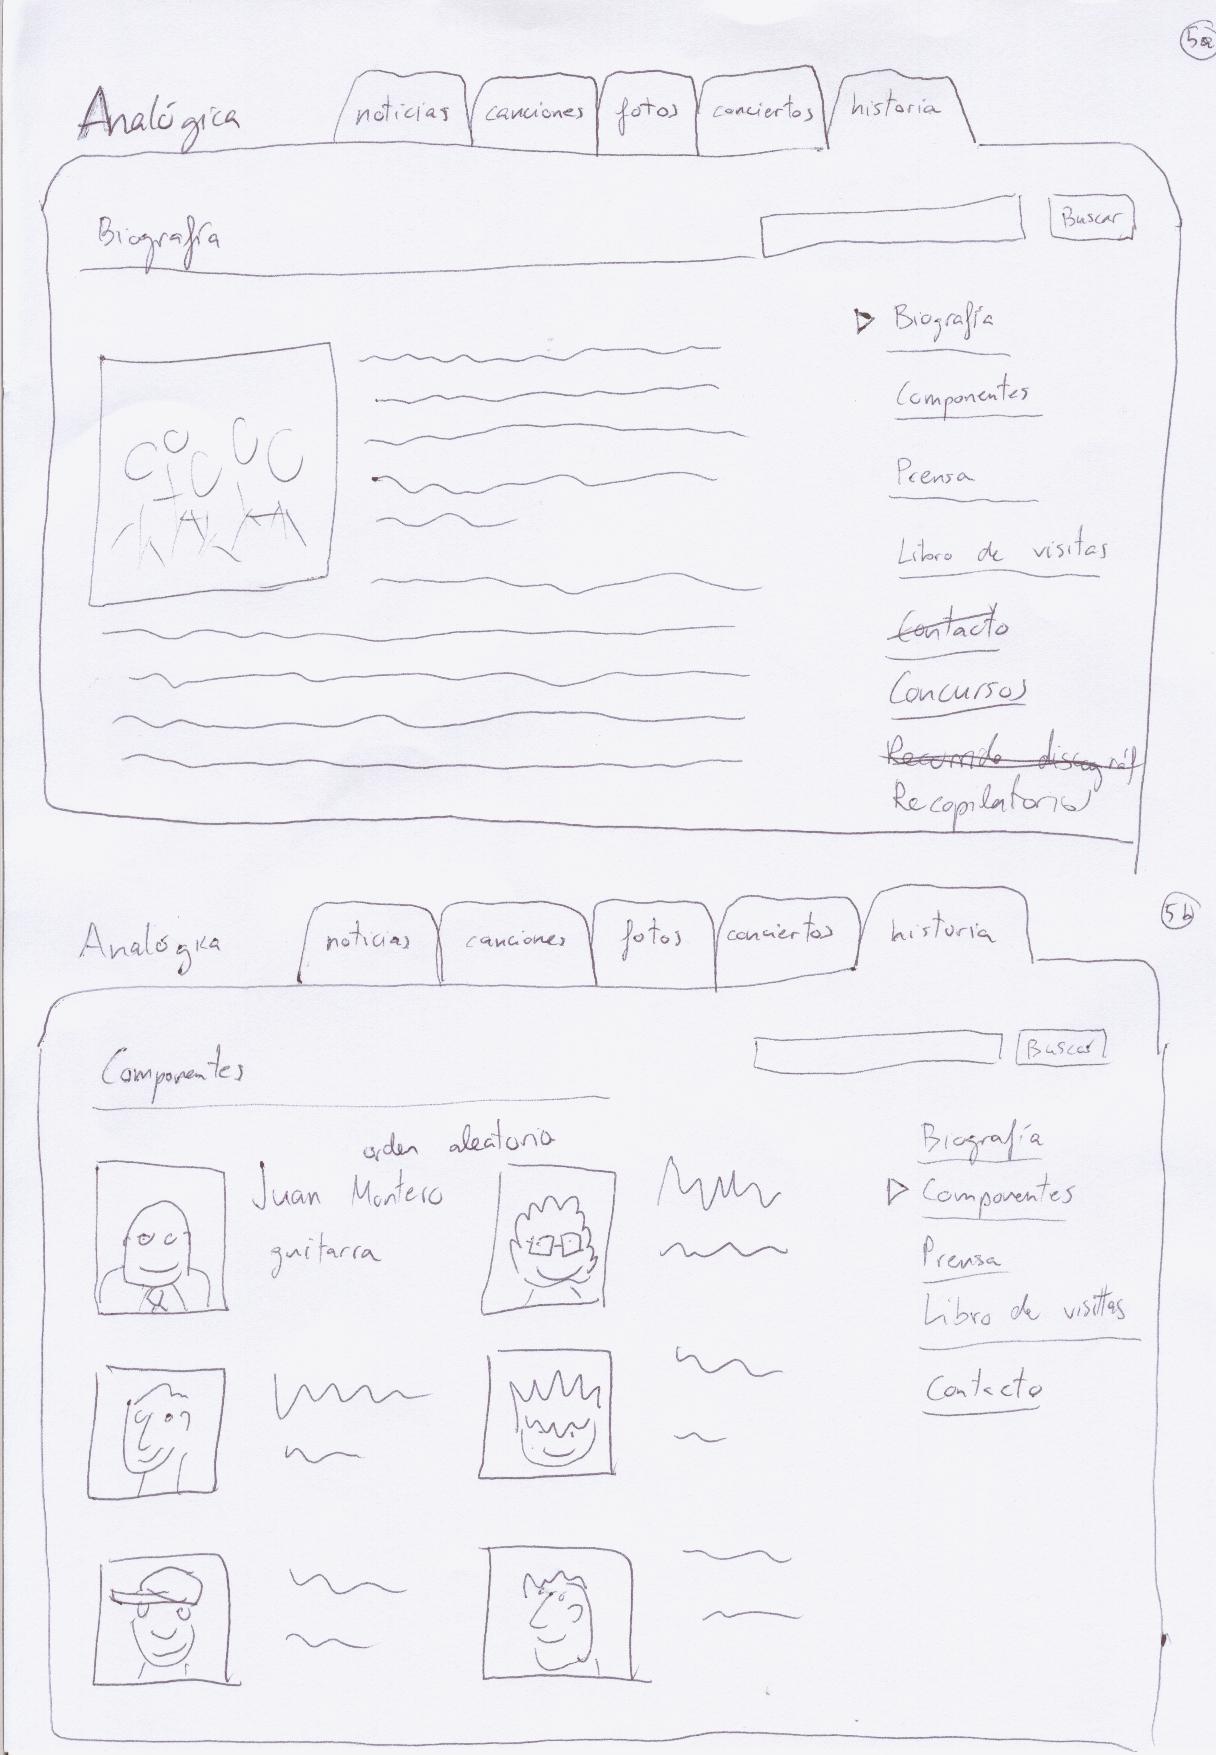
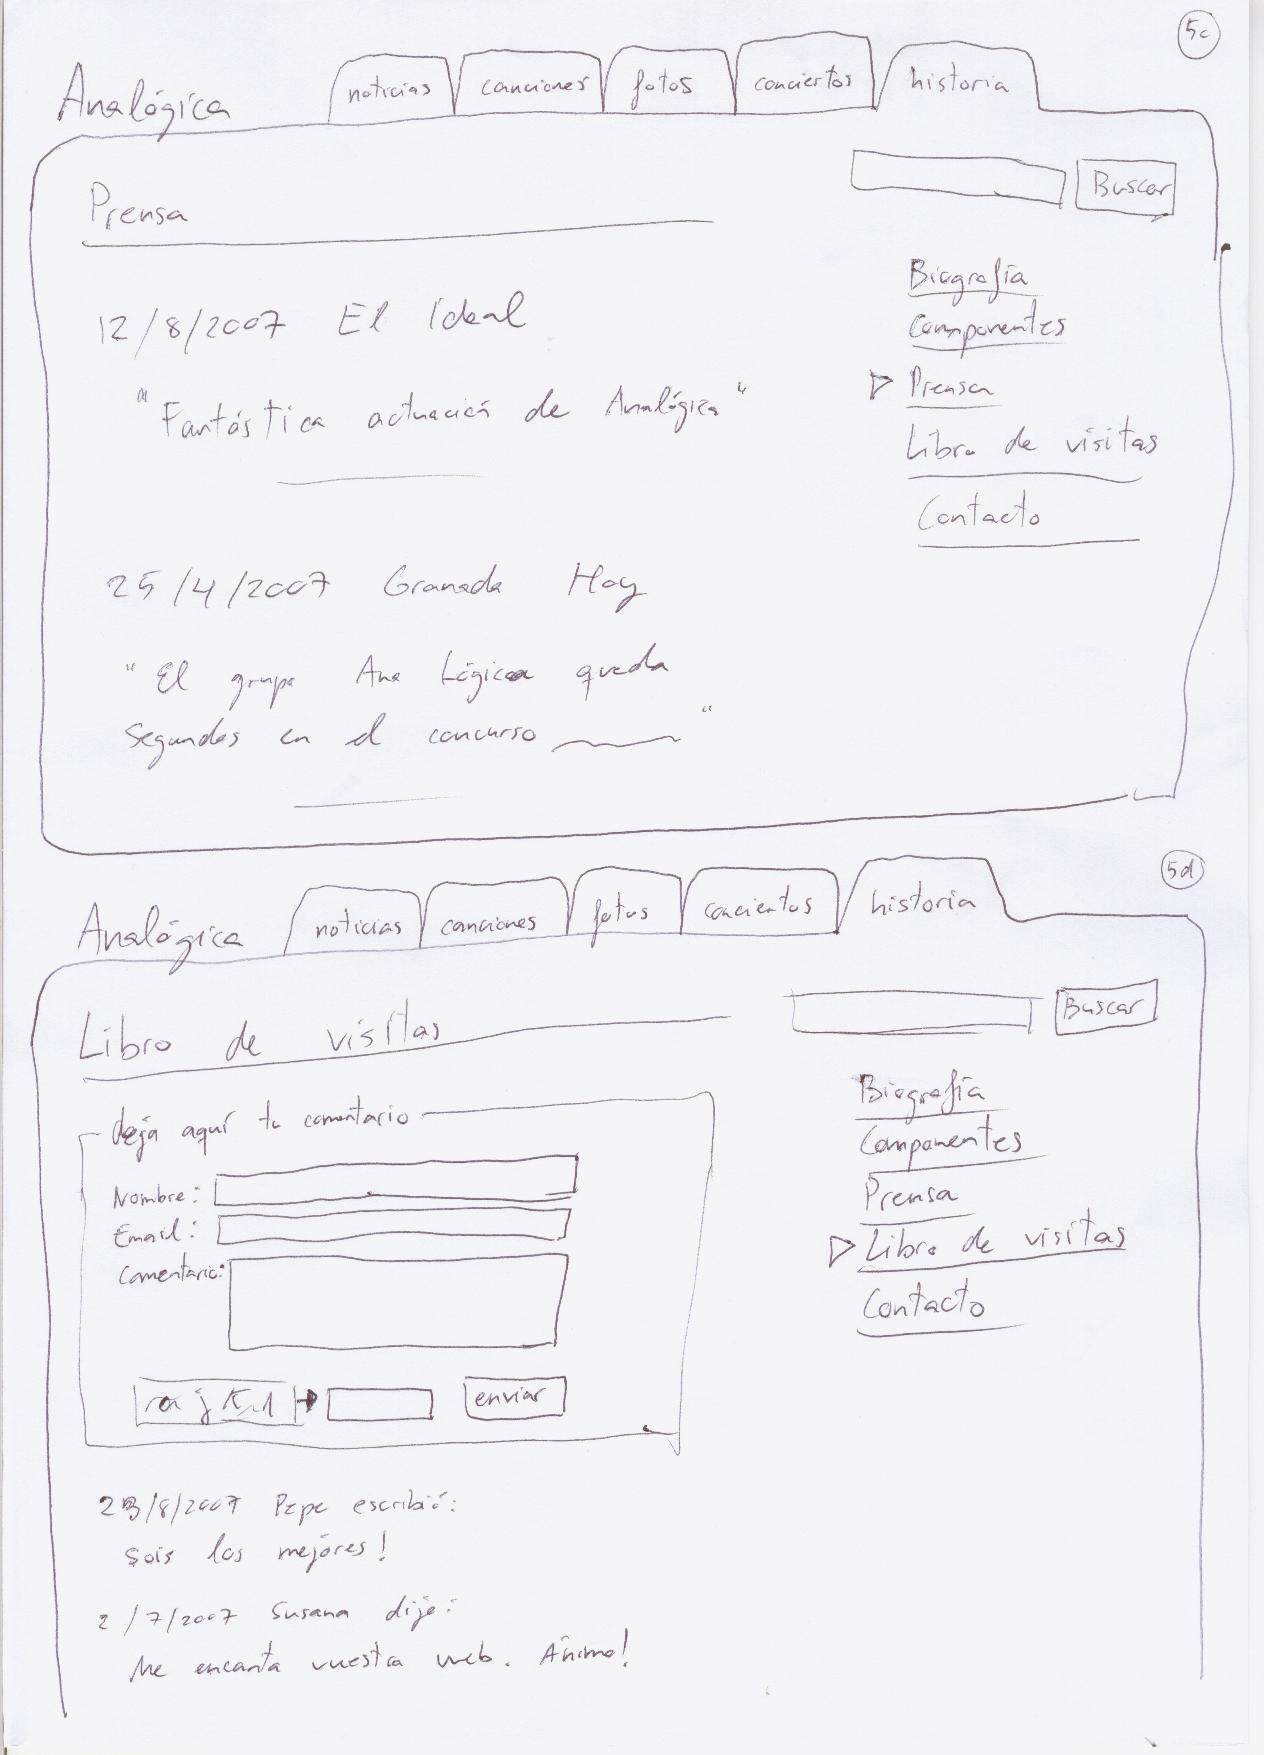
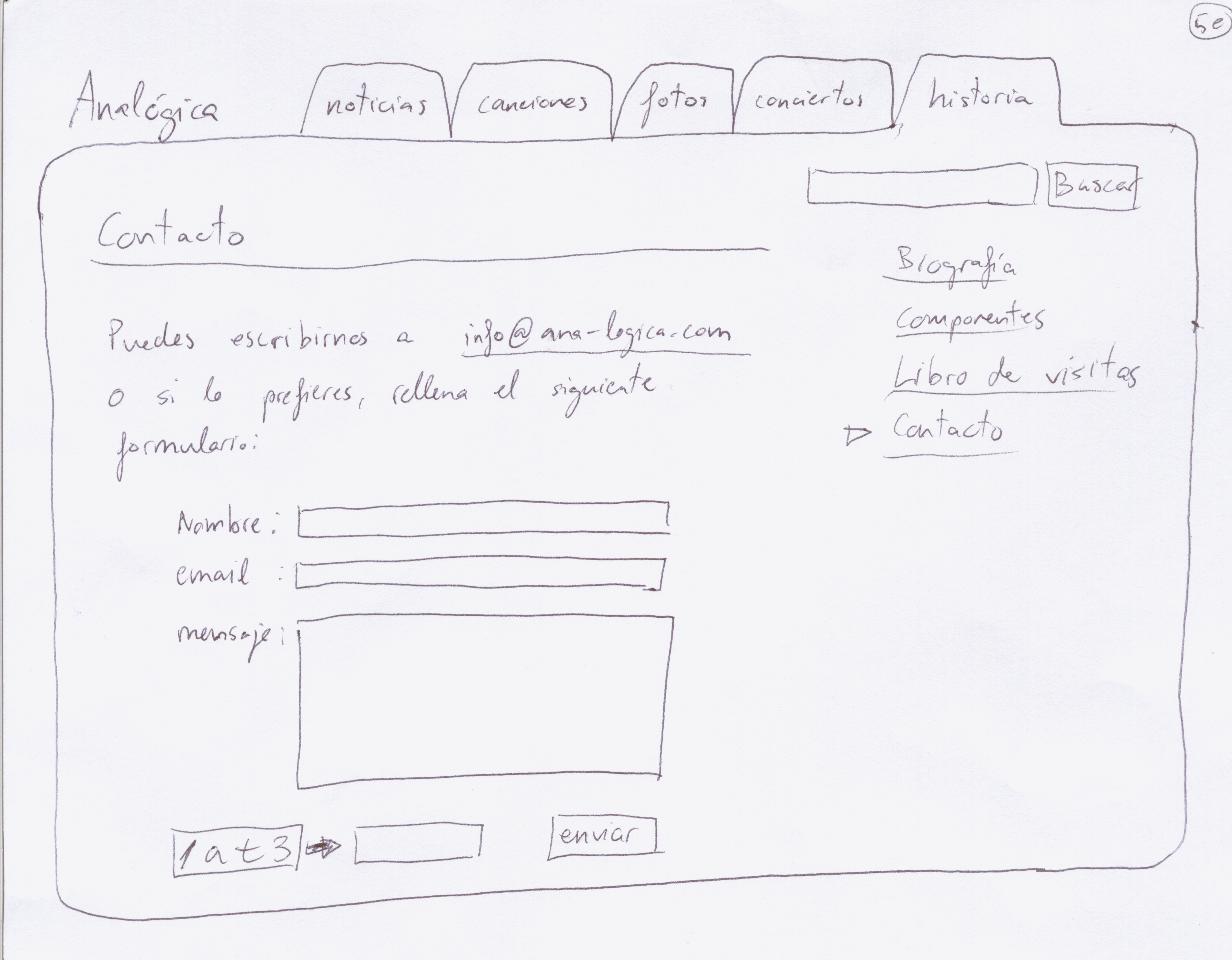
I drew all the screens in paper in a fairly detailed manner (10 screens in total). Then I photocopied them and got 5 copies and scheduled a meeting with all the members of the band. We met in a bar and while drinking some beers we discussed my design. They liked it generally but gave me some new ideas and spotted minor things they didn't like or I did fogotten. We also made a list of the multimedia and information material they needed to give to me. I was really happy with the results of that initial meeting because:
- They got a pretty realistic view of how their website was going to look like
- The paper prototype allowed us to speak about something touchable and not about abstract concepts
- That made possible to discuss improvements and changes of my design and also to make a good checklist of the material needed
It took us less than one hour and a half (including other chats, drinking and eating) and I got everything I needed to get me started. Lesson learned: always meet the client before you make any coding and if you can, make a paper prototype, you can't imagine how much work and frustration you will save by doing so.
Choosing the technology
Now that I knew what I had to do I needed to choose how to do it. In other words, the technology. I choosed Django over Zope or PHP for this project for the following reasons:
- It was a well defined project that is not going to change or grow a lot in the future. No need for a component architecture here.
- Most of the information is read only (except for the guest book) so no fancy forms were needed. This is one of the weak points of Django in my opinion but I didn't needed them for this project.
- The users (the members of the band) are young savvy computer users so the Django Admin interface is perfectly usable for them. I didn't want to maintain the content of the website so this is a big +1 for Django's admin interface. These three reasons pushed me to decided Django over Zope3 and for PHP...
- I only choose PHP if the application is already done in PHP (and I need to extend it or fix it) and/or the hosting is fixed and it doesn't allow my other favourite technologies. Neither the case for this project.
Coding, the fun part
It was time to get my hands dirty so I created a subversion repository to put my code in and started to make a Django 0.96 application. I only worked in my (not so frequent) spare time. I started on the 5th of September and got a beta version yesterday. Acording to my commits I worked 13 days and I estimate an average of 2-3 hours each day: around 30 hours in total. Not too bad, huh?
First I designed the models and created the database. For development I used SQLite and for deployment I used MySQL. I set up some fixtures so I didn't have to input all the data again and again. By designing almost all the models initially, rebuilding the database was something I didn't have to do very often.
Then I started to write views for each tab page. It's important to note that I didn't write any CSS code yet. The pages were really ugly but at the same time were pretty clean and allowed me to focus on the functionality and structure without distractions. I made 80% of all view code before even thinking on any visual design issue.
Then my friend sent me the material. He sent me the graphics for all their home-made records and reminded me that they want the website to look similar to the last record graphical design. So I opened my vector graphics application (Inkscape) and designed the homepage of the website. I thought about doing that in a raster graphics application (GIMP) but happily I used Inkscape which let you change a lot of stuff much more easily than with GIMP.
When I finished the graphical design I sent it to my friend for validation and after some minor corrections they all agreed with it so I could continue. Then I started moving that desing into the website using CSS and some graphics. I'm pretty proud of the final result since it's quite elastical and adapt to a wide range of screen resolutions. Of course its XHTML and CSS validates and it's quite accesible. Long life to web standards!
Next challengue was to make a template tag for the navigation tabs so it could automatically detect which one was selected in each view. In the settings.py file I had a list of tabs:
  NAVTABS = (
  ('/', 'Noticias'),
  ('/songs/', 'Canciones'),
  ('/pictures/', 'Fotos'),
  ('/concerts/', 'Conciertos'),
  ('/band/', 'El Grupo'),
  ('/contact/', 'Contacto'),
  )
Each tuple having an url prefix and the label of the tab. Then my custom templatetag looks like this:
  @register.inclusion_tag('navtabs.html', takes_context=True)
def navtabs(context):
    request = context['request']
    path = request.get_full_path()
    tabs = [dict(url=url, title=title, current=path.startswith(url))
            for url, title in settings.NAVTABS]
    active_tabs = [t for t in tabs if t['current'] is True]

    # We may have two or more current tabs if prefixes are the same
    # In this case the longest matching prefix wins
    if len(active_tabs) > 1:
        # sort the tabs by its length
        def sorter(tab1, tab2):
            return cmp(len(tab1['url']), len(tab2['url']))
        active_tabs.sort(sorter)

        # The only current one is the longest one (the last)
        for tab in active_tabs[:-1]:
            tab['current'] = False

    return {'navtabs': tabs}
And the template navtabs.html looks like this:
<ul id="nav-tabs">

</ul>
Now, all I have to do in my master template file is add this piece of code to have automatic navigation tabs! :
\{\% load navtabs \%\}
\{\% navtabs \%\}
And if I change, add or remove a tab I just need to update the settings.py file.
Automatic downloads
Something the band wanted is that the users could download their songs. I thought about two options: a) downloading each songs individually so you can get a grasp of how the band sounds like and b) download the whole album if you liked them. This way everybody saves bandwidth :-) But I didn't want to store the mp3 files twice in the storage server. Each one individually and a ZIP for each record with the mp3s inside it.
So I decided to create the zip files on the fly:
def record_download(request, record_id):
    record = get_object_or_404(Record, id=record_id)
    buffer = StringIO.StringIO()
    zip = zipfile.ZipFile(buffer, "w")
    for song in record.song_set.all():
        filename = song.get_audio_filename()
        zip.write(filename, os.path.basename(filename))
    zip.close()

    name = u'Ana Logica - %s.zip' % unicode(record.title, 'utf-8')
    name = name.encode('utf-8')
    response = HttpResponse(mimetype="application/zip")
    response['Content-Disposition'] = 'attachment;filename="%s"' % name
    response.write(buffer.getvalue())
    return response
Layout problems and JQuery rescue
My layout is the typical header - main content with right sidebar - foot layout and I wanted to apply a soft background image tileable vertically in the sidebar. Usually you go for a liquid layout where you fix the width of the website and create a big horizontal image (something like 800x5 pixels) and repeat it all over the main content. That way, when you float right the sidebar everything looks like the height of the sidebar is the same as the height of the main content even when that is not actually the case. But I had two problems:
- My width was not fixed but a percentage of the screen width resolution
- My background image was not 5 pixel tall but 356 pixels height
So how did I solved it? Using a javascript oneliner :-) :
$(document).ready(function () { $("#sidebar").height($("#body").height()); });
Now my sidebar is always as tall as the main content (div id="body") of my website and the background image is applied properly.
I had a problem with 800x600 screen resolutions: as the main content has a width of 80%, in those resolutions it was not big enough and the tabs collide with the logo. Some more javascript and problem solved:
function fix_layout() {
  /* If the window is too small, no margins */
  if ($(window).width() < 880) {
    $("div#page-wrapper").css("margin", "0");
  } else {
    $("div#page-wrapper").css("margin", "0 10% 0 10%");
  }
  /* Make the sidebar as tall as the #body element */
  $("#sidebar").animate({height: $("#body").height()}, 1000);
}

$(document).ready(fix_layout);
$(window).resize(fix_layout);
Now you can see that when the user has an old screen he/she can still view the website properly but with no margins. I love the way javascript looks after dressing it with JQuery :-)
Automatic thumbnailing
As the band is going to update the content and not me I wanted the design to stay as good as initially. This mean no big images popping suddenly in the middle of a news item or a gallery. This also means I can't trust my users to resize the images because they are humans and humans usually forget those tedious things. So I stolen this small template tag to get automatic thumbnailing for free:
def thumbnail(file, size='200x200'):
    # defining the size
    x, y = [int(x) for x in size.split('x')]
    # defining the filename and the miniature filename
    basename, format = file.rsplit('.', 1)
    miniature = basename + '_' + size + '.' +  format
    miniature_filename = os.path.join(settings.MEDIA_ROOT, miniature)
    miniature_url = os.path.join(settings.MEDIA_URL, miniature)
    # if the image wasn't already resized, resize it
    if not os.path.exists(miniature_filename):
        filename = os.path.join(settings.MEDIA_ROOT, file)
        image = Image.open(filename)
        image.thumbnail([x, y], Image.ANTIALIAS)
        image.save(miniature_filename, image.format)
    return miniature_url

register.filter(thumbnail)
This is an example of how to use it:
Stop spam, read books
Something I had learned from the past is this rule: every public HTML form you put in a website is going to be used for spam sooner or later. You need to assume it and live with it: either you don't put public forms or you fight spammers with a captcha or similar techique. I decided to go with recaptcha.net as it looks quite nice and they use the information the users write for digitalizing books. Really smart.
Adding support for recaptcha is fairly easy:
- Register in recaptcha.net and get a pair of keys. Put them in the settings.py file
- Download the python package for recaptcha and just put the captcha.py file inside your application
- Write a template tag stupidly simple using the displayhtml function of the previous captcha.py file:
@register.simple_tag def recaptcha(): return captcha.displayhtml(settings.RECAPTCHA_PUBLIC_KEY) - Add this to your template, inside the form:
\{\% load recaptcha \%\} <form method="post" action="."> \{\{ form.as_p \}\} \{\% recaptcha \%\} <p class="center"><input type="submit" value="Enviar" /></p> </form> \{\% endblock \%\} - Add this function to your view:
def captcha_is_valid(request):
    challengue = request.POST.get('recaptcha_challenge_field', '')
    response = request.POST.get('recaptcha_response_field', '')
    ip = request.META.get('HTTP_X_FORWARDED_FOR', '')
    captcha = submit(challengue, response, settings.RECAPTCHA_PRIVATE_KEY, ip)
    return captcha.is_valid

def contact_form(request):
    if request.method == 'POST':
        form = ContactForm(request.POST)

        if captcha_is_valid(request) and form.is_valid():
            # send the mail
            ...
The problem with recaptcha is that you need to type two words instead of one and the band members have complained to me saying it may be too difficult for their visitors. Sigh :-(
Conclusion
I probably forget to mention some stuff but I guess this post is already way too long so I will stop now. I'll just mention that I developed the whole thing using Firefox 2.0 and I tried the page in Internet Explorer 7.0 I was happily surprised since it looked pretty good. I know it doesn't look as nice in Internet Explorer 6.0 and I need to do some more work to fix it but the success with IE 7.0 made me happy and I have hopes in a web development future where we can finally say, write one surf everywhere :-)
Besides using strict standards I recommend you using 'em' instead of 'px' in your stylesheet as much as you can to get best results.
Well, that's all for now, I hope you learn something from my experience. I certainly did with this project and get some fun with it!